

If you landed here because you want to figure out how to start a blog that actually makes money, you’re in luck, my friend!
This article is going to walk you through everything you need to know, including those important little things that no one seems to share until you’re six months in and realizing you did it all wrong!
Oooops.
Because the truth is: setting up a new blog isn’t all that difficult. But setting up a blog that is actually primed to help you make an impact and an income? Well, that requires a little more research and work.
But it’s soooo worth it!
And lucky for you, I did all that work already (the right way and the wrong way)…and I’m here to help YOU avoid all of those newbie mistakes that often come with starting a blog.
This is a long one, so grab a drink and kick up your feet! And be sure to pin this baby for later, just in case you get distracted halfway through!

{{ Our blog posts contain affiliate links. These don’t cost you anything extra, but they allow us to continue running this site and providing free content for our readers. Full disclosure here. }}
WHAT TO DO BEFORE YOU START A BLOG
Since we’re talking about starting a money-making blog (not a hobby blog), there are a few things we need to have in place from the get-go. Make sure you have these two little things set firmly in your mind before you even try to start a blog.
1. CHOOSE A FOCUS
Before starting your blog, you should have a clear idea of WHAT you want to write about and WHO you want to write for. This is sometimes referred to as your “niche” or your “niche market”.
Don’t let these words scare you! Your niche is really just your own well-defined audience that wants or needs exactly what you’re offering on your blog.
Seriously…that is it.
Money-making blogs are not personal diaries where you share whatever is on your mind (save that for the hobby blog). Money-making blogs are useful and relevant to a specific type of reader. And money-making bloggers always write for their readers.
So, think about who you want to impact with the content you share on your blog.
What are they interested in? What are they searching for online? How can you help them fill a need or accomplish a goal?
Narrowing down the focus on your blog is going to make YOUR JOB much easier in the long run. Because if you’re speaking to a targeted person and helping them with their targeted needs, it will lead to more blog traffic and income down the road (more on this later)!
Important note:
It is OKAY to write about a few different topics. You just need to make sure that everything you write about is appealing and useful to your target audience.
For example, let’s say a food blogger has a niche market of readers who are on the ketogenic diet. She writes blog posts that are all about the keto lifestyle. Delicious recipes, workouts that are ideal for the keto diet, keto-friendly shopping lists, etc.
She writes about multiple TOPICS, but all of those topics are interconnected and useful for her target reader. She is solving very specific problems for a very specific group of people. And as her blog grows and gains authority, she will become known as the go-to person for all things keto.
And that’s what it’s alllll about baby!
2. LOOK AT YOUR BLOG LIKE A REAL BUSINESS
Once you have a clear picture of your target reader and a clear focus for your blog content, you can give some more thought to the ultimate purpose for this blog. Yes, you want it to be useful to your readers, but what is it going to do for YOU?
Success means something different to each of us, so we have to think about what we’re trying to accomplish with this blog in the long-term.
Is this your creative outlet that just needs to pay for itself? Is this the side hustle that will hopefully replace your day job one day? Or is this going to be your full-time job, starting today?
Of course, this answer will depend on your own individual situation, needs, and goals. But the bottom line: if you want to make money from your blog, then you will need to think of your blog like a real business.
This starts with setting up your blog on a solid foundation – one that will last and help you to make an impact and an income.
And just like any other successful business owner, you want to be able to own, operate, and customize your business to your liking… which is exactly what we are going to help you accomplish in this step-by-step guide.
Let’s get to it!
First off, I want to clear up some of those crazy misconceptions about blogging … because there are A LOT of them. And most of them are things you do not need to be stressin’ about!
MYTH # 1: It’s difficult and time consuming to start a blog.
Myth-buster: Nope. Not true at all.
It does take some work of course, but this is actually something you can accomplish in a single day. Compared to a lot of start-ups, this is gonna be suuuuuper quick.
We’re gonna squash this misconception right here in this article, as we walk through the exact steps of starting your blog today.
Yes. You read that right.
You can actually start your blog TODAY by following the steps outlined below. It’s a little bit of work, but if you follow the steps carefully, it’s pretty darn straight forward.
And with the beauty of modern technology, you can very likely have everything setup and ready to roll TODAY!
MYTH # 2: It costs a lot of money to start a blog.
Nope. That’s not true either.
In fact, starting a blog is one of the absolute cheapest business ventures that exist today (with the lowest overhead too).
Yes, there are a few small costs that come with setting up a blog the right way, because you want to make sure that you actually own your website, have a professional website address, and basic legal protection.
But it does NOT cost thousands of dollars. Not even hundreds of dollars for most of us.
And we’re going to break down all the absolute essential investments below, so hang in there with me!
MYTH # 3: You can’t make money blogging anymore.
Truth be told, the income you earn from your blog WILL depend on many factors, including your niche, your business knowledge, your strategic effort, and your consistency.
And it’s NOT as easy as it used to be.
However, there are many bloggers out there making five, six, and seven figures from their blogs RIGHT NOW.
In my personal case, I was able to build up a profitable blog in less than a year, and now I have a handful of profitable blogs.
Here are a couple screenshots of recent deposits (because yeah, blogging income is real, babe, and I got the proof right here)!
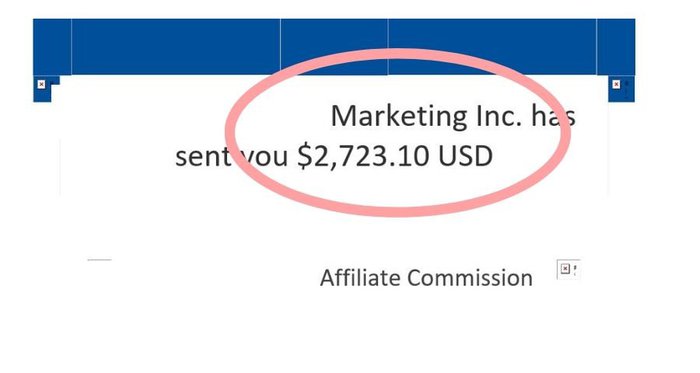
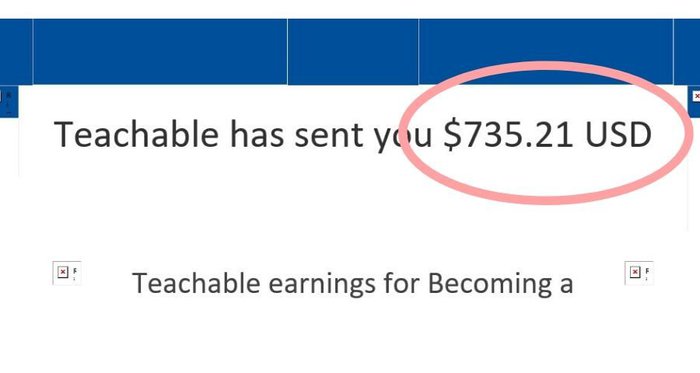
Not sharing this to brag, not at all! It took a lot of hard work, sweat, and tears to get here.
I just want you to see the income potential.
Bottom line: there is still a lot of money to be made from blogging. And we’re going to get your blog setup and primed to start bringing in that income sooner than later.
HOW TO START A BLOG THAT MAKES MONEY
There are (7) basic things that you need to do to actually start a blog the right way (the profitable way). I’m sure there are some things we can tack to the bottom of this list later on, but these are the most important things for getting setup!
THING ONE: CHOOSE A DOMAIN NAME
Your domain name is your website address (the virtual address where your website lives online).
It’s also the first thing people are going to see when they come across your blog post in Google searches. And it’s what people will type into their search bar when they want to find your latest article.
Sample domain name: www. YourDomainName .com
The domain name you choose should have some connection to the content you’ll be writing about, and it should include a keyword, if possible. And here’s why:
Reason # 1
A clear domain name with keywords lets your potential readers know exactly what they can expect to find on this blog, before they even open the page.
If it’s a fitness blog, having a word or words like ‘fitness’ or ‘health’ or ‘workout’ in the domain would help your reader determine what your website is about.
If it’s a mom blog, having ‘mom’ or’ mommy’ or ‘motherhood’ in the domain would be a good fit.
Always try to make things as CLEAR AND SIMPLE as possible for your potential readers. Because quite honestly, user experience is everything!
Reason # 2
A clear domain name with keywords lets Google (and other search engines) know what your blog is all about.
Remember: Google depends on keywords and site optimization to learn about your blog and determine when they should share your blog posts in search engines. So, give ol’ Google a helping hand and use your keywords!
A domain name that includes a keyword about your blog content is ALWAYS a good idea.
However, if you already purchased a domain name and you are kicking yourself because it doesn’t have a keyword in it, don’t sweat it. You can still get by without an optimized domain name.
It’s just EASIER to use a domain name that makes sense to your audience and search engines right off the bat.
And I’m allll about doing things the easy way whenever I can!
So, at this point, we’ll assume that you know what you want to write about and who you want to write for. We’ll assume that you have jotted down some potential domain name ideas for your blog. And we’ll assume that you’re read to spend a few bucks on buying your domain name.
PRO TIPS:
Make sure your domain name is easy to SPELL and easy to REMEMBER. It’s not the time to be cutesy or ultra-unique. And if possible, always choose a domain name that ends with .com …
Now, you’ll head over to NameCheap.com to type your domain name into the search bar. Make sure you have a few options lined up, just in case your first picks are already taken.
Select your domain name of choice and add it to your cart.
Your NameCheap cart will look something like this when you’re ready to order:
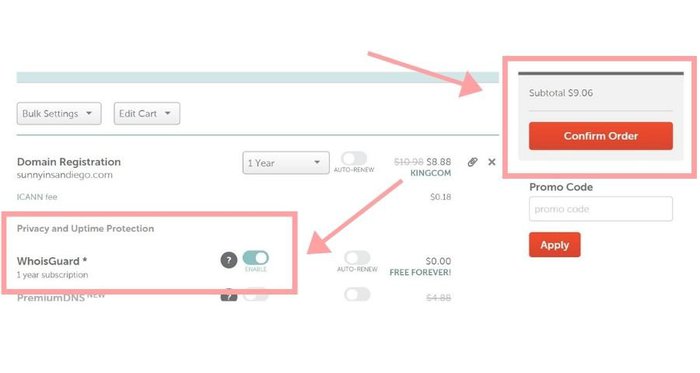
You definitely want to enable the FREE WhoisGuard privacy protection, because this protects your information from being shared publicly (including your phone number and email address).
Just toggle the button on, like you see in the picture above.
Confirm your order, and BOOM!
You’re a domain name owner.
THING TWO: GET WEBSITE HOSTING
Before you can start monetizing your blog, you’ll have to decide where that blog is going to live online.
Your blog will “live” on the servers of a website host. And because of this, you NEED hosting before you can start blogging.
Here is a detailed guide on the difference between hosted blogs and self-hosted blogs.
If you don’t get a chance to read that article linked above, here’s the bottom line: a self-hosted blog is the best option for almost every blogger.
This route gives you unlimited options for customization and monetization. And it gives you full ownership of your blog, which is a big deal.
What website host should you choose?
There are some great hosts and some mediocre ones, but there are NO perfect ones. These are the top three that I recommend, based on their price, customer service, and track record.
NAMEHERO*
*When I initially wrote this article, Siteground was my main website host for most of my sites and had been for years. I still use them and have no issues with them.
BUT… I have found NameHero to be much cheaper and just as good (99% up time, free email, free SSL etc).
For this reason, I am moving Namehero to my # 1 hosting recommendation, just because of the affordability.
Siteground, Namehero, and HostArmada are all good hosting options.
You only need to choose ONE HOST to setup your blog, but I wanted to give you a few options.
SITEGROUND
Siteground is a host that I’ve been using for years, and I have no complaints or regrets. Their setup process is simple, their customer service is great, and their prices are super affordable for a beginner.
Just keep in mind that (as with most hosts) the annual cost goes up after your introductory period, so you’ll need to account for that down the road.
More reasons why I love Siteground: it has a historic up-time of 99% and my website has a historic uptime of 100% for the last five years. Meaning that my website is never down.
They also offer FREE 1-click WordPress installation, FREE SSL certificate, and FREE business email address.
HOST ARMADA
Host Armada is another good host option and they usually have great deals going on!
All (3) of these hosts are great options, but you only need to choose ONE. Flip a coin if you must, I won’t judge.
Since I personally use Siteground on many of my sites, the following steps and screenshots will walk you through buying hosting through Siteground, but the process will be similar no matter what host you choose.
STEP 1: CHOOSE A HOSTING PACKAGE
When you go to the Siteground homepage here, you’ll see a few options. Select ‘Web Hosting’ on the left side of the screen, and then select your hosting package.
Prices fluctuate and the look and layout of the site may change as well, but generally speaking, you’re going to follow the simple steps of choosing a hosting package and a domain name and installing WordPress software.
Don’t get overwhelmed by little differences, just try to focus on the task at hand: setting up the site no matter what it takes!

STEP 2: CHOOSE A DOMAIN NAME FOR YOUR BLOG
Most likely, you already purchased your domain name from NameCheap, which is the recommended route. You’ll see a box with two options on this next page and you’ll be prompted to choose a domain name.
Technically, you CAN purchase a domain name right from Siteground, but for security purposes, it’s best to keep your domain name and your hosting separate.
If you do decide to purchase your domain name directly from Siteground, you’ll select the option to ‘Register a Domain Name’.
Then type your domain name of choice into the empty box and click “Proceed” to see if it’s available.
If you want to use the domain name that you just purchased from NameCheap (recommended), you’ll select the option that says, ‘I already have a Domain Name’ and type your domain name into the box.
Looks like this:

You have to have a domain name in order to purchase hosting, so keep this in mind. After you’re finished with your purchase, you can redirect your domain name to Siteground.
Their customer service team can help you do this, or you can follow the step-by-step instructions later in this tutorial.
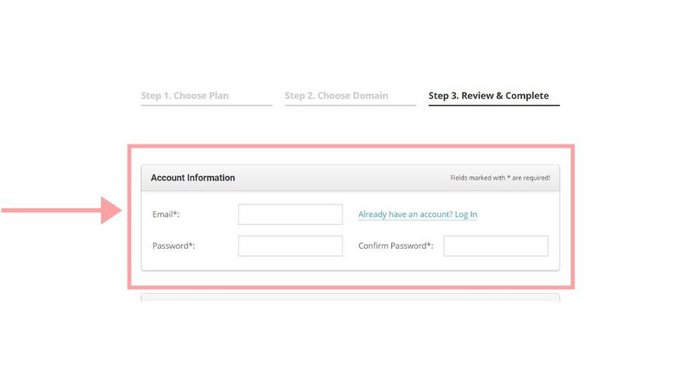
STEP 3: SET UP YOUR SITEGROUND USERNAME, PASSWORD, AND PAYMENT INFO
This is where you’ll officially create your login information for your Siteground account and add your payment information for hosting.
Note: the optional add-ons do increase the price and for most new bloggers, they are unnecessary. You already got your domain privacy when you purchased your domain through NameCheap, so you’re good to go!
If you go with the cheapest plan for one year, the total is usually around 50-70 bucks, but you can also lock in this introductory price for up to (3) years if you have the budget for it.
Now, you have a domain name and you’ve purchased your website hosting – whoop whoop!
Your blog has an address and a place to live online!
So, where do we go from here?
If you bought your domain name directly from Siteground, you’ll skip the next thing and go straight into installing WordPress .org (you will likely be prompted to do this right when you complete your hosting purchase, which is fine either way).
If you bought your domain from a third party like NameCheap, you’ll need to point your domain to the Siteground servers before you can officially launch the blog, following these steps below.
This is the third step in our 7-step blog setup process (almost halfway there)!
THING THREE: POINT YOUR DOMAIN TO YOUR NEW HOST
In your Siteground account, click on the ‘Information & Settings’ tab.
There, you’ll see several rows of information, and one of the first few rows will say: “Account DNS”. The Account DNS info will be two lines of text that start with ns1 and ns2. If you cannot find this info in your settings for some reason, contact Siteground here and they’ll help you.

This is the info that you need to share with NameCheap to let them know where your domain name is going to be hosted from now on.
So, just copy and paste those two little lines of text next to the words “Account DNS” and then head over to NameCheap. You’ll need to do this with whatever domain company you purchased from, but the screenshots below are from NameCheap because that’s who we use around here.
Login to NameCheap and then click on ‘Domain List’ on the left side of your screen. Every domain that you have purchased from NameCheap will be on this list.
If you just purchased your first domain name ever, there will just be one option here. Check the box next to the domain name that you want to redirect to your new website hosting servers, and then hit the ‘Manage’ button next to that domain.
It will look something like this:

Under the ‘Manage’ section for this domain name, you’ll scroll down and click on the drop down menu next to NameServers.
Select Custom DNS and then paste those two NameServers that you copied over from Siteground into these two spots.
It looks like this:

Type each of those ns1 and ns2 NameServers into the two boxes and hit the green check mark to save!
After NameCheap and Siteground both catch up to this change, your domain name will be redirected to Siteground hosting and you’ll be ready to start building your blog!
It can take up to 48 hours for the change to go through, but it only took a few hours in my case. If you have any technical issues, you can contact Siteground support HERE or contact NameCheap support HERE.
THING FOUR: INSTALL WORDPRESS.ORG
WordPress.org will be the dashboard that you use for creating and publishing content for your readers. This is also where you’ll design and customize the look and layout of your entire website.
In other words, this is where the magic happens!
Now that you have your domain name and your hosting, you can login to your Siteground dashboard with the username and password you just created, and follow THESE STEPS to install WordPress.org through Siteground (it’s free)!
During this process, you will also create a new username and password to login to WordPress. Write it down, because you’ll need this info every day of your blogging career!
Once you have WordPress.org installed through Siteground, you’ll be ready to login and design the look of your blog.
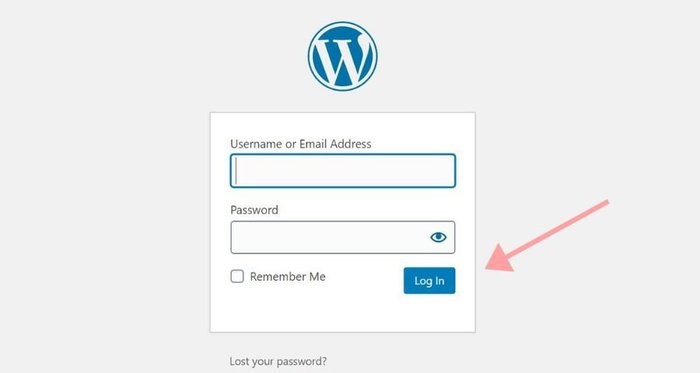
To login, just type your domain name into your search bar and add: /wp-admin to the end of it.
For example: YourDomainName. com/wp-admin (don’t leave any spaces)….
This will take you to your login page for WordPress, where you can access and design your new site!
It’ll look like this:
Keep in mind that your actual website will only be visible online AFTER your domain name has been pointed to Siteground (or other host) servers and after you have installed your security certificate.
But you can still download the WordPress software, so go for it!
IMPORTANT NOTE:
You should use one username and password for your Siteground hosting account and a completely different username and password for your WordPress.org admin login account.
When you need help with things like your hosting, your payment info, your website backup, and your email systems, you’ll login to your Siteground account.
When you need to write, edit, publish, share content, download themes and plugins, add widgets to your blog, and communicate with your readers, you’ll login to your WordPress.org account.
So, login to WordPress.org and let’s move on to our next step in setting up this blog!
THING FIVE: INSTALL YOUR SECURITY CERTIFICATE
I know we’ve covered a lot of ground in this post already, but we’re almost done! And essentially, here is what we have accomplished:
- We bought a domain name (a virtual address for our blog).
- We bought hosting, which is kinda like the plot of land where our blog lives.
- We pointed our domain to our host, which is kinda like setting up a forwarding address.
- And we downloaded the free WordPress software, where we’re going to setup the look and layout of our blog.
Pretty gangsta babyyyyyyyy!
Before we login and start playing around with your new website, we need to make sure that your website is safe and secure. More than likely, you won’t even be able to see the website online until it is secured through your host.
It is important for your website to have a security certificate (SSL). Google will penalize you if you dont have one, and many web browsers will block access to your site if it isn’t secure.
Secure sites have an HTTPS:// at the beginning of their website URL. This stands for: Hypertext Transfer Protocol Secure.
Non-secure sites just have the HTTP:// (they are missing the S, which stands for SECURE)…
Thankfully, your SSL security certificate is FREE and easy with Siteground, and you can set it up in just a few seconds.
Just login to your Siteground account, click on your cPanel, scroll down to your Security area, and click on the ‘Let’s Encrypt’ icon.
Looks something like this:

Hit that button to install your SSL certificate. Here is a detailed SSL tutorial if you get stuck.
After your security certificate is installed, you’ll be ready to login and dress up your website!
THING SIX: CHOOSE A THEME
Your website theme is essentially the template that keeps the look, layout, and content on your site organized. You can use a free theme or purchase a premium one.
FREE THEMES are perfectly fine to use!
You do not need to spend a ton of money on buying themes or designing your website right now. As long as the theme is mobile friendly and easy to navigate for your readers, that is all that matters.
To activate a theme on your website, you’ll login to your WordPress dashboard and go to Appearance > Themes. The themes that you already have downloaded will be listed here. It looks like this:
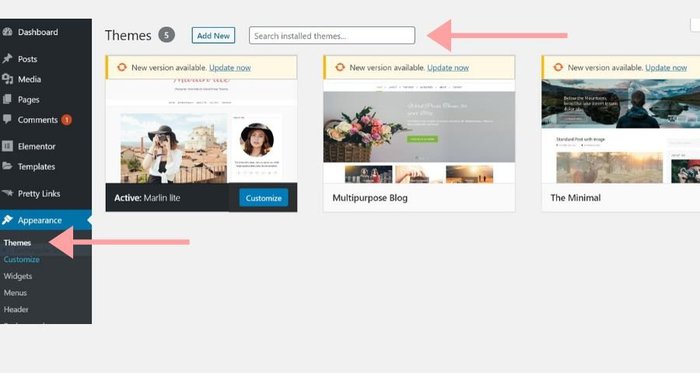
You can choose from one of the themes right there on the Themes page, or you can upload a theme that you have purchased or downloaded elsewhere.
Here are the exact steps for adding or changing your blog theme.
Essentially, you’re going to choose a theme and hit the ‘Activate’ button to make that theme visible on your website.
Some good free themes:
Astra
Kadence
But make me a promise right now, okay?
Don’t overthink this one. Just choose a simple mobile-friendly theme and then get to work on creating some awesome content. You can always change your theme later, so don’t get hung up on it today.
Choose a theme, activate it, and then we can move on to our final step of starting a blog!
THING SEVEN: START WRITING
That’s it!
You just started a blog, and now, you’re ready to start writing some great content your readers will love.
You will do your writing and publishing through your WordPress dashboard. So, bookmark your login page and save your login information to make it easier to access.
Before you write your first blog post, I definitely recommend reading this article and this article. Because we’re trying to build a blog that actually makes money, right?
Anyone can write content on a website, and never make a dime from it…and that’s totally okay if it’s your hobby and not your business.
But if you’re trying to make a steady income from your blog, then you will want to write content that actually makes you money. Content that is useful and relevant to your target audience will help you to grow and make money.
ESSENTIAL INVESTMENTS WHEN YOU START A BLOG
Here is a quick and easy breakdown of the absolute essentials that most bloggers will need to invest in when they get started. You’ll see that most bloggers can get started for under $300.
- Domain name from NameCheap: starting around $10.00 per year.
- Website hosting from Siteground or Namehero: starting around $50 the first year.
- Website theme: plenty of FREE options but you can also find affordable themes under $50.00.
- Legal pages drafted by a lawyer to protect you and your website: $197.00 for a 3-page legal bundle.
Side note: if you can’t afford legal pages right now, follow this guide to design your own pages.
PUTTING IT ALL TOGETHER
Let’s wrap this baby up like a rolled taco and make sure we’ve got the basics down for how to start a blog.
We know that having our own self-hosted website is the best way to start a blog and make money. I recommend Siteground or Namehero if you’ve got the 50 bucks to spend.
Once your blog is set up, it’s time to start writing helpful, problem solving content for your target audience. Try to publish at least one solid blog post each week, but always focus on quality over quantity.
There will be a lot more to learn along the way, but this is your foundation. Rock the heck out of it and remember to have fun along the way! And when you’re ready to start monetizing, this guide can help.
If you found this article helpful, be sure to pin it on your Pinterest board so you can refer back to it later…


Great tips – I’m a relatively new blogger still trying to navigate the whole blogging world. Getting there slowly but surely – I’ve taken my time but I’m starting to get involved with affiliate marketing – wish me luck!
Hello Cate! Thank you for this! I recently decided to leave years of full-time jobs and give myself permission to finally start my own art business! I am an artist/illustrator but I’ve LOVED writing since I was a little girl and am working hard on writing blog posts to help and encourage other artists out there! I would love it if I could turn my blog into one of my income streams and am learning as much as I can so I’m glad I found your site. Will be back for sure! Thanks again!
How exciting! Starting your own blog/business is probably the most exciting, scary thing you can do! Send me a link to your blog and I’ll check it out and give you some feedback. You can also register for my upcoming training to help you out, its a comprehensive 30-day program that teaches you how to turn your blog into a business: http://bit.ly/2Cj2vpo Enjoy every moment of your new venture!
There’s so much to learn! The blogging world is so different from every other field, which is exciting but also scary haha! Congrats on taking the leap into affiliate marketing. It’s a great way to make some money!
Awesome clear to read tips – thanks !
Very nice and informative post
Great tips, I wish I had seen this before starting my own.
Hi Cate! Great post 🙂 I started blogging when I was 16 and haven’t stopped since, but over the past 5 months or so I’ve been attempting to make money with my blog. Through affiliate links I make around $30-50 a month, but I’m really hoping to grow that. I can use all the tips I can get!
Thanks for this info! I don’t cutrently monetize my blog, but now I have a jumping board to do it when I’m ready!
Great tips. I know when I started, I could have used these.
Loving your blog thus far! Definitely looking to get more consistent with my posts and monetize this year.
I’m glad you’re enjoying it! If you need help along the way, don’t hesitate to ask me.
Thank you girl. That’s exactly what I wanted to do, provide easy to follow tips for new bloggers, so I’m glad that shines through. There will be lots more to come!
Good for you, if you need any help along the way, just let me know!
Thank you!
Thank you, we have a lot more info to come on monetizing your blog, so stay tuned!
That’s awesome, affiliate marketing is great! I’ll have more tips coming soon about great ways to monetize.
Thank you!
Thank you for the article! I’ve been following you for a while now, and I have a very silly question: I’ve just started my blog but I’m italian and even if I can understand english quite well, I’m totally not able to write articles in english. Do you think this would be an obstacle in monetizing my blog and reaching a big audience? Thank you!
Congrats on starting your blog! I don’t think it will be an obstacle necessarily, but if it was me, I would find someone to edit my blog content for clarity. I would always want my readers to get a clear picture of what I’m saying….unless you choose to write all of your content in Italian, and reach an Italian audience, which is also an option!
This is going to be INCREDIBLY helpful once I set up!! Thanks!
I’m sooo glad!! Let me know if you need any help along the way!
Very useful information for folks just starting out. Sometimes its just a matter of someone laying it out simple for them. Good work.
Thank you!
Love this! I have recently joined your Facebook group and I found this article very helpful for my new blog 🙂 Thanks for writing!
Thank you so much! So glad to have you in my group 🙂 This guide is definitely the best starting point!
Such great tips and confirmation that I’m on the right track with setting up my blog, thanks so much for sharing!
Awesome, I’m so glad you’re on the right track!
Hello there, Can I sign up and use SiteGround if I already have my free wordpress blog site set up?
Yes, Siteground is a hosting company (they host your website on their servers). When you purchase hosting, you’ll download WordPress .org through your host and they will transfer your website for you. Siteground is having a labor day sale right now too: sweetandsimplelife.com/siteground
Im so glad I found you! I wanted to set up a blog to possibly help out with the household bills because my husband is the only one working. I don’t expect much but of anything is better than nothing which is what i am making now , big fat nothing and i have been messing around with it for about a year or so, I just want to understand all the legal stuff before I jump in with both feet. I thought what better way than to write about what I love most!!! Crocheting! I want to use my crocheting to help others. My dream is to help the mothers & their children in family abuse shelters & those little ones that get put into the foster system . I just hope that now I can start getting inspired to write my pwn patterns . Thank you so much for all your help !!! REALLY!
Thank you so much for commenting and sharing your story! I’m always here to help if you get stuck along the way!
Hi Cate,
I have registered my domain name with Namecheap.com. I get complimentary WhoIsGuard privacy protection along with the domain name.
I guess I don’t need the domain privacy add-on. (I don’t even get it as an option, just the SG site scanner. ) Do you agree?
P.S. I am using your affiliate link 🙂
Thanks
I agree, the site scanner is not necessary if you have privacy protection in place!
I’m amazed with this post! but there is one thing I wanna ask and clarify, when you pay for siteground, does it require a credit card or a debit card will do? I’m struggling to earn money for my blog’s self hosting
Oh and yeah I almost forgot, when you put the monthly option for siteground, do you pay it monthly or you pay for it as a whole year? I’m really confused whenever the price appears. It scares me
You will be paying annually, the start up package costs $47.40 (the add ons are extra and you can unclick those buttons if you don’t want to purchase them). I highly recommend purchasing several years in advance to lock in that introductory price.
You can use a debit card! I used a debit card for purchasing my hosting. And thank you so much for reading, I appreciate you!
Great tips there! I have surely learned a lot and I just can’t wait to monetize my blog!
Thanks for your article. Did you mention what theme you picked? Im having a hard time finding where to add a subscribe options/pop up and also- how to make my contact for work. Thanks!
Thank you for reading. My theme didn’t come up pop up options, but I use Mailerlite for my subscription/opt in forms. Super user friendly and FREE 🙂
Thank you Cate. Whereas I’m old I’m determined to make this work. I’m a retired school teacher and my husband has been ill. I’m writing about children’s books, parenting tips, and misc. baby posts. What theme did you use here ? It’s so pretty and inviting. Can you share ?
Thank you Cate. Whereas I’m old I’m determined to make this work. I’m a retired school teacher and my husband has been ill. I’m writing about children’s books, parenting tips, and misc. baby posts. What theme did you use here ? It’s so pretty and inviting.
This is the FREE marlin lite theme, and I love it!
I’m just getting started and according to the comments, I’m in the right place to do it. Your writing style is easy to read, making this complex topic seem not so complex. Thank you for all this great info. And I learned a thing or two from the comments section too. Awesome 🙂 My domain name is through GoDaddy, and with your info will get it hosted with Siteground. And we’re rolling!!
Congratulations on getting started, I’m glad my article was easy to read and understand – making things SIMPLE is always my goal! I’m here if you need any help!
I am a big fan of Neil Patel (neilpatel.com). And as you may know, he is a pro tech blogger. But here’s the thing, even he can’t write this great- state of an art kind of article. I love your work.
Really a very useful information given by you. i learned lot of useful information about money making blogs from this post. article is nicely explained and easy to understand. thanks for sharing this valuable information with us. keep your good work.
Thanks for reading!
Thank you for such a wonderful article.
I have been digging and nagging all over for how and what to do. Your guide is easy to follow and setup. Thank you so so much. 😊🙏
I’m a newbie to the blogging world. I’ve already started writing blogs on WordPress.com, Now that I read this post of yours it’s motivating me to proceed with making some money out of what I write. Thank you for this!! It would be great to have a video explaining the steps
Your content is SO HELPFUL! You’re top of mind with a couple other sources when I’m looking for somewhere to check for blogging guidance! (And I found you through Pinterest so that marketing is working for you!)
Just had a quick question… how many posts a week would you say is IDEAL? I know in this article you mention one quality one a week, but what’s your in-a-perfect-world recommendation?
Thanks for reading and commenting! I believe in quality over quantity for sure, so if you can only do one great blog post per week – awesome! If you can do two? Even better! Obviously, the more great content you have, the better you’ll be able to market that content and get it in front of more eyes. 2-3 insanely helpful, optimized, quality blog posts per week will DEFINITELY get you where you want to go!
I can definitely do a video walk through soon, thanks for the idea!
I’m so glad it was easy to follow and helpful – that is my only goal!
What is the procedure to copyright a blog content (text and images)?. I wish to copyright the content on my blog (content and images)?? can anyone please guide as to how can i go abt it?.
Your blog content has a copyright the moment it’s created. You can protect your images by putting a watermark over them. Hope this helps!